
The Impressive Optolong L-eNhance Filter by AstroBackyard
The Impressive Optolong L-eNhance Filter
Copyright: AstroBackyard
In this post, I’ll share my results using the Optolong L-eNhance filter for deep sky astrophotography in the city. The L-eNhance is a dual band pass filter that ignores artificial light, yet collects a strong signal emitted by certain nebulae.
This light pollution filter was designed for color cameras, whether it’s a DSLR (a modified camera is best) or a one-shot-color dedicated astronomy camera like the one used (ASI294MC Pro) for the images in this post.
As many of you know, I mostly shoot from the city. I love to travel to dark sky locations, but imaging from home is a lot more practical, and I can do it more often.
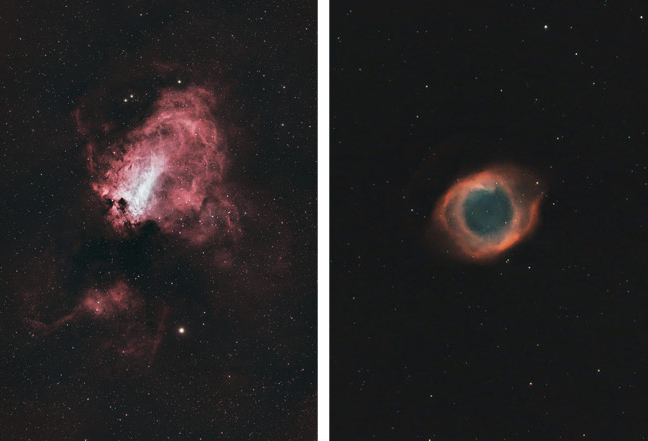
The Omega Nebula & Helix Nebula| ZWO ASI294 MC Pro + Optolong L-eNhance Filter
Optolong L-eNhance Filter
The Optolong L-eNhance filter was designed for color cameras, such as a DSLR camera or a one-shot-color astronomy camera. The camera used for all of the example images in this post is a ZWO ASI294MC Pro, a 10.7 MP 4/3″ sensor camera with cooling.
If you take a good look at the transmission graph, you’ll notice that the first band pass line includes both the OIII, and H-beta wavelengths. Essentially, this means that the filter should collect an even more “natural” looking image than one that isolates Ha and OIII exclusively.
The H-beta (486.1nm) emission line is nowhere near as impactful as the hydrogen-alpha line (656nm) when photographing an emission nebula target, but I like the idea of including this subtle wavelength for a more well-rounded image.
Transmission Lines
- H-beta: 486.1nm
- OIII: 501nm
- H-alpha: 656nm
As you’ll see in the images shared in the post, this transmission combination leads to some surprising “natural” looking images when used with a color camera.
In the video below, you’ll see me use the Optolong L-eNhance filter for deep sky astrophotography in the backyard. Notice the bright white LED streetlamps that line my street. These artificial lights are largely ignored by the L-eNhance filter, as they do not emit light in the spectrum that passes through the filter.
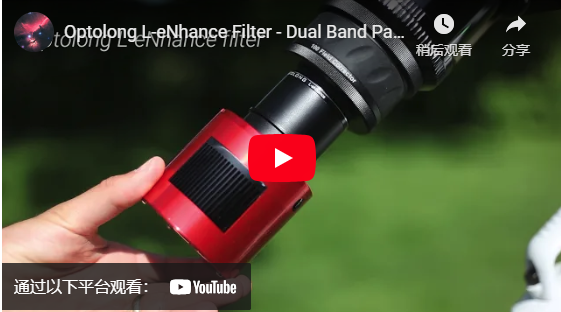
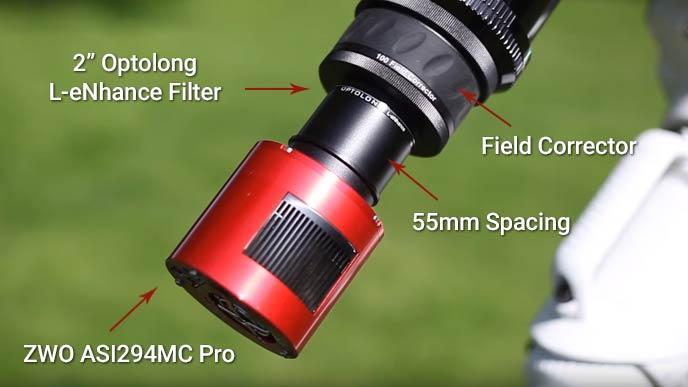
In the video, I’ve threaded the Optolong L-eNhance filter (48mm version) to the field corrector of my Sky-Watcher Esprit 100 refractor telescope. The filter sits between the sensor inside my ASI294MC Pro color camera and this apochromatic refractor telescope.
Threading the filter directly to the field corrector involves carefully removing the internal ring that seals the filter glass into the housing. The reason for this is to access the threads on both sides of the filter. I do not recommend this method, as the filter glass becomes loose, and you could easily drop or damage the filter.
Instead, I would look into a filter drawer system that is compatible with your telescope. This allows you to easily swap filters in and out of the imaging train, and maintain the accurate spacing between your camera sensor and the corrector/field flattener.
Some telescopes, such as the William Optics Zenithstar 73, or Radian Raptor 61include a threaded slot for a 2″ filter inside of the field flattener and/or adapter. This is a very convenient location for a 48mm filter, as it is completely sealed from the elements.
Optolong L-eNhance Filter Specifications
Here are the technical specifications of this filter, coming straight from the company. I have to admit, I don’t know what most of these terms mean, but in the spirit of creating the most useful resource possible, I’ve included them for those that do.
- Blocking Range: 300nm – 1000nm
- Blocking Depth: >99% light pollution line
- TPeak: T>90%
- Substrate: B270
- Thickness: 1.85mm
- Surface Quality: 60/40
- Transmitted Wavefront RMS: λ /4
- Parallelism (arcsec): 30s
If you don’t know what the transmitted wavefront RMS reading means in terms of the pictures you can expect to capture with your color camera, keep reading…
Imaging Results from the City
The first object I chose to photograph was the Butterfly Nebula, which is also found within the Sadr region in Cygnus. The reason I chose this target for my testing, was because this area is absolutely loaded with emission nebulae. If you have a filter that specializes in isolating H II regions, this is an area of the night sky you need to photograph.
Having used a dual band pass filter in the past (STC Optical Du0-Narrowband) from my backyard, I had a feeling that the L-eNhance would meet my expectations. I primarily shoot using a color camera, to maximize the chances of completing an image in a single night. If you are like me, a dual band pass filter may be the answer you are looking for.
In the past, I have used a number of Optolong branded filters, including narrowband “line” filters for Ha, OIII, and SII. The Optolong L-Pro is one of my favorite broad-spectrum filters, so my experiences with this company have been stellar thus far. (They even sent me an Optolong Flag for my garage as a thank you for my video content!)
Results using a 100mm Refractor Telescope
The first image was captured using a high-end refractor telescope (ED triplet apochromat), with a focal length of 550mm. The image scale of this system is 1.7, which creates a pleasing resolution for wide-field nebulae targets like the one below. To find out the image scale of your camera and telescope, you can check out this online calculator.
With a dual-band pass filter like the L-eNhance, moonlight, and the glow of my city do not interrupt a memorable imaging session in Cygnus. Below, is the image I captured using the L-eNhance filter with my ZWO ASI294MC Pro (one-shot-color) camera. The final image includes 69 x 4-minute exposures for a total integration of 4 hours and 36 minutes.
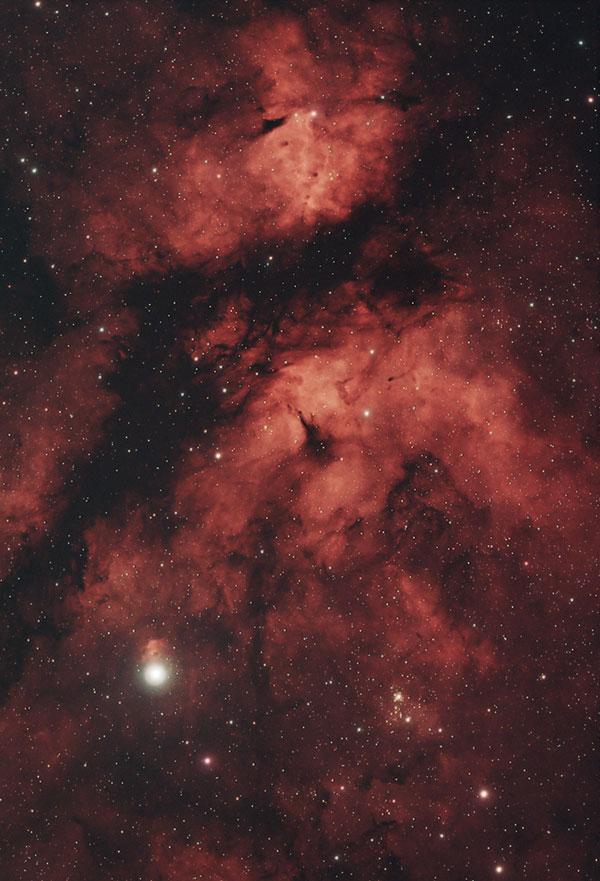
The Butterfly Nebula in Cygnus. 69 x 4-minutes.
Full Review: https://astrobackyard.com/optolong-l-enhance-filter/
YouTube: https://www.youtube.com/watch?v=D2qYDGHBZ2U&t=2s