
L-Ultimate Reviewer - scientist Ariel L. Cappelleti: Halos..., but at least in my personal opinion is not a great deal, for me is not a problem at all.
Optolong L-Ultimate 2" Duo Narrowband Filter Test
Credit: Ariel L. Cappelleti
First Part: Spectrophotometric Measurements
Spectrophotometric measurements were made using a Shimadzu UV-1700 UV-VIS spectrophotometer, in transmittance mode, using sampling interval of 0.1 nm, and a scan velocity of medium.
a. Optolong L-Enhance 2” Duo Narrowband Filter measurements (for comparison):
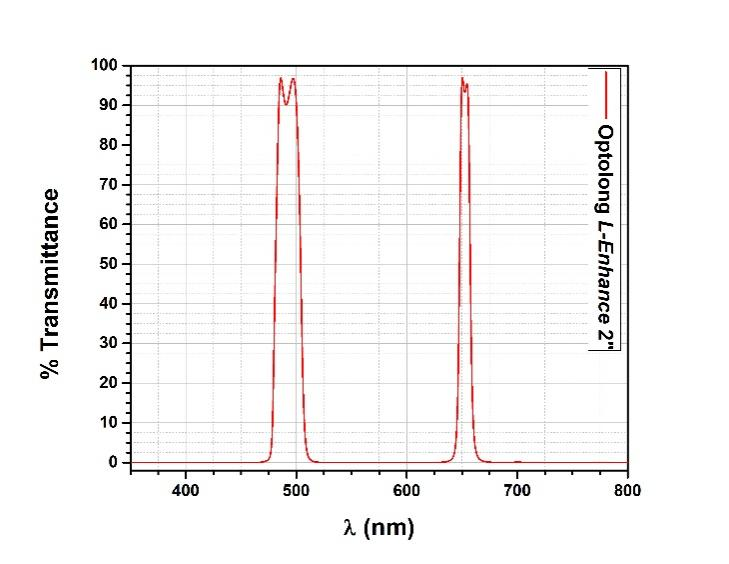
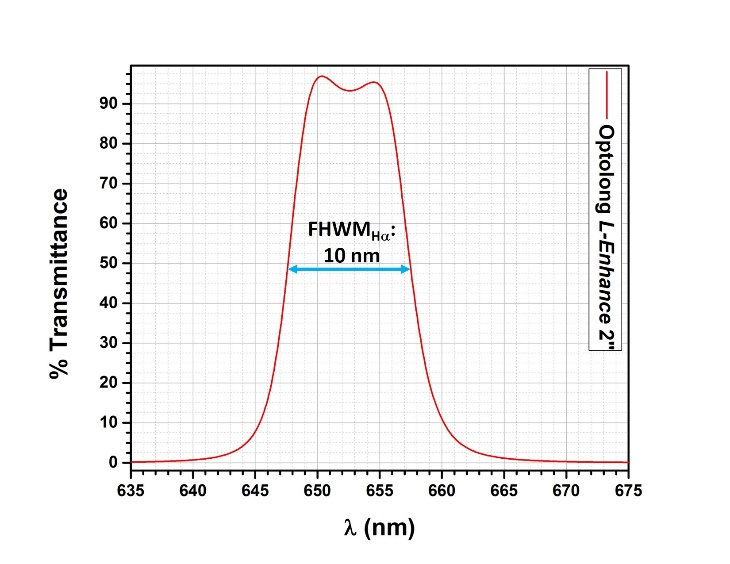
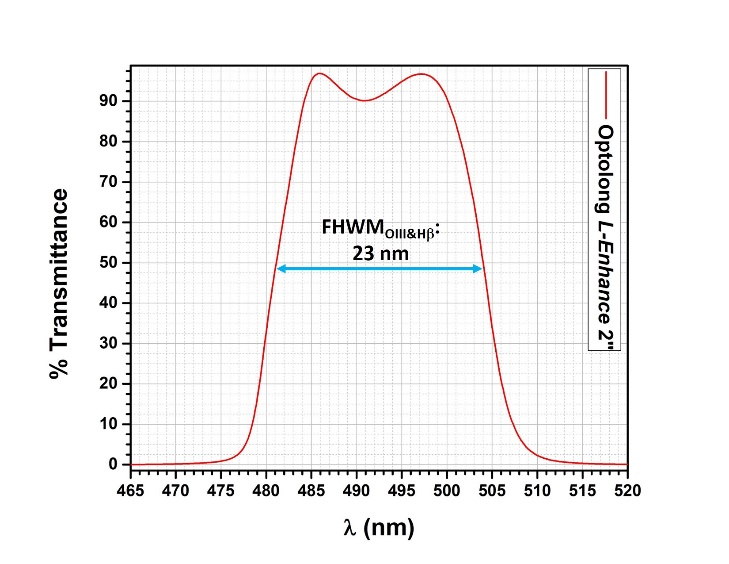
Measurements of L-Enhance filter showed that it has two transmission bands, the first band is centered around 493 nm and it has a FHWM of 23 nm, corresponding to the transmission of Hb and OIII emission lines. The second band is centered around 653 nm, with a FHWM of 10 nm, corresponding to the transmission of Ha emission line. The two band detected has a transmission > 90%, all these findings are in perfect agreement with the technical specs published by the brand Optolong.
b. Optolong L-Ultimate 2” Duo Narrowband Filter measurements:

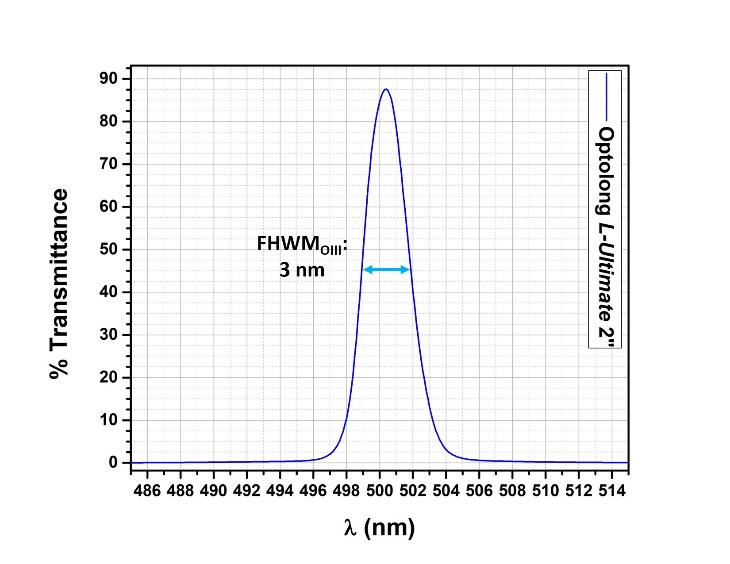
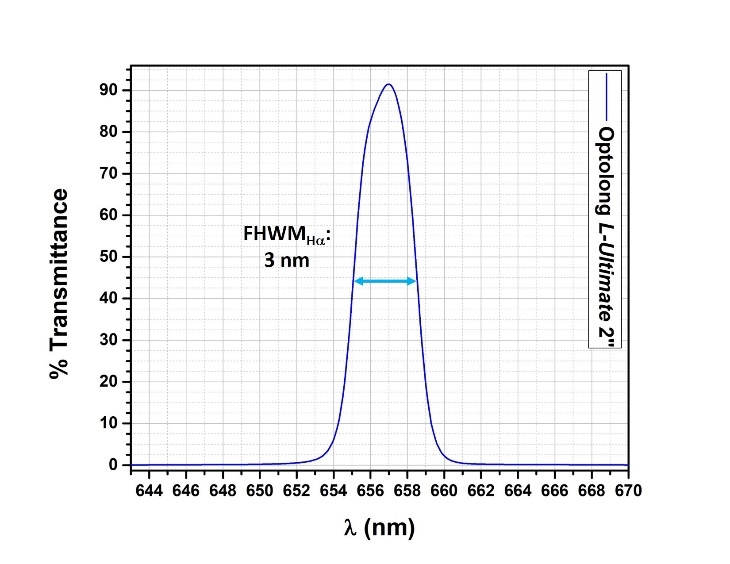
Measurements of L-Ultimate filter showed that it has two transmission bands, the first band is centered around 501 nm and it has a FHWM of 3 nm, corresponding to the transmission of OIII emission lines. The second band is centered around 656.5 nm, with also FHWM of 3 nm, corresponding to the transmission of Ha emission line. The two band detected has a transmission ~90%. All these findings are in perfect agreement with the technical specs published by the brand Optolong.
Second Part: Bright Stars Test (All the next images were stretch only using Screen Transfer Function (STF)).
a) ZWO ASI183MC-PRO and Sky Watcher 200p equipped with ZWO OAG:
My first test was to used my setup with better resolution that consist in a Newtonian Telescope (Sky-Watcher 200p 200/1000mm F5), which has a Coma Corrector 0.909x. The telescope is equipped with a ZWO EAF. My colour camera for this test was the ZWO ASI183MC-PRO, which I have attached to a ZWO OAG and a ZWO 2” Filter Drawer. The star chosen, considering the season in southern hemisphere, for these test was a really bright star, Rigil Kentaurus/Alpha Centauri (+0.10 Apparent Magnitude according to Stellarium).
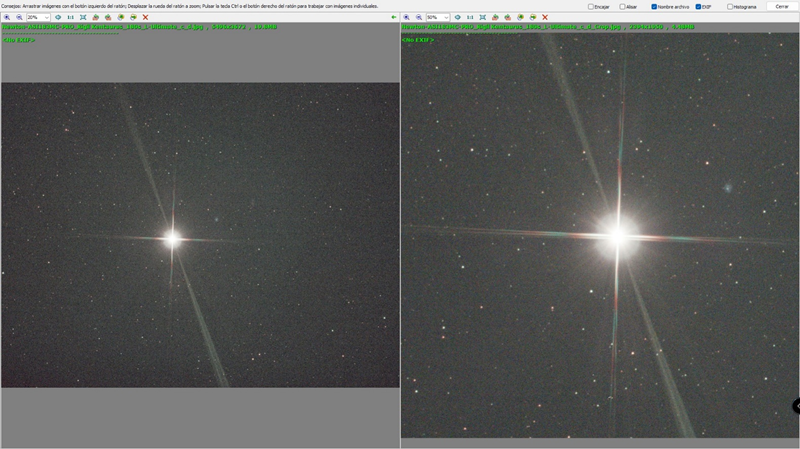
Figure 1. 180s, Gain 111, Camera Temperature: -15 °C exposure of Rigil Kentaurus, complete frame (left), zoomed (right).
As can be seen in Figure 1, with this setup and star it can be seen that the image suffers from a Halo around the brightest star. It is worth to notice that the star is a really bright star, this kind of bright star are rarely close to nebulas, so maybe it will not be a great deal. An important statement is that the diagonal reflection seen in Figure 1 is probably due to OAG prism or internal reflection of Newton geometry arrangement of mirrors, and is not a problem of the filter tested, other filters showed the same pattern in other tests. Also in Figure 1, it can be seen a pattern of microlensing diffraction, this is a problem of the camera and not of the filter employed. In order to avoid these inconveniences a second test was made using an APO refractor with no OAG, and a Reflex camera with no microlensing problems reported.
b) NIKON D7500 and ASKAR ACL200 F4:
The telescope (ASKAR) is equipped with a ZWO EAF. My colour camera for this test was the NIKON D7500, the filter was mounted on ACL200 internal filter adapter. The stars chosen, considering the season in southern hemisphere, for these test was two a really bright stars, Rigil Kentaurus/Alpha Centauri (+0.10 Apparent Magnitude according to Stellarium) and Hadar (+0.55 Apparent Magnitude according to Stellarium).
In this test no diagonal reflection or microlensing diffraction patterns can be observed as was expected by the change of equipment. As can be seen in Figure 2-3, Halo around the brightest star can be detected in both stars images, although in the case of Hadar the Halo is much less important. Hadar is less bright than Rigil Kentaurus, so these findings are in agreement. This Halos will be more present and noticeable when stacking of images will be done, but at least in my personal opinion is not a great deal, for me is not a problem at all. Also, as I said before, is not that common to find that kind of bright stars when you image nebulas in DSO imaging. I would expect, to the best of my knowledge, that the halo would become less and less detectable as the stars that are present in the FOV become less bright.
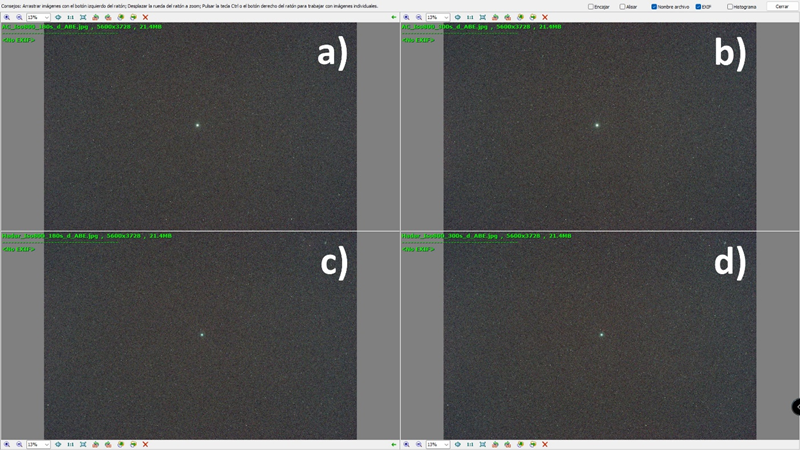
Figure 2. Stars Test with ASKAR ACL200 F4, L-Ultimate filter and Nikon D7500, ISO 800. Complete frames a) Rigil Kentaurus 180s, b) Rigil Kentaurus 300s, c) Hadar 180s, d) Hadar 300s. All images were treated with Automatic Background Extraction (ABE) function degree 1.
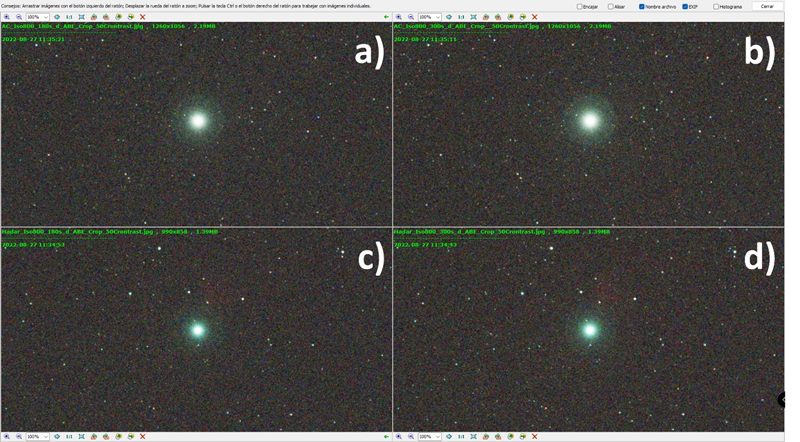
Figure 3. Stars Test with ASKAR ACL200 F4, L-Ultimate filter and Nikon D7500, ISO 800. Zoomed frames a) Rigil Kentaurus 180s, b) Rigil Kentaurus 300s, c) Hadar 180s, d) Hadar 300s. All images were treated with Automatic Background Extraction (ABE) function degree 1, and 50 points of contrast were added in PS to help to see the Halo more clearly.
Third Part: Nebula Test, comparison between Optolong L-Ultimate and Optolong L-Enhance filters:
For this part of the test I wanted to take some individual image with my duo narrowband filters (L-Enhance and L-Ultimate) and compare what I am getting from each of one. This comparison is not ideal, because L-Enhance has FHWM of transmission bands way too big (24nm for OIII and 11nm for Ha) in comparison to L-Ultimate (3nm for both Ha and OIII), the fairer and ideal comparison would be between with L-Extreme (7nm for both Ha and OIII) and L-Ultimate, but unfortunately I don’t have the former one. All the next images were stretch only using Screen Transfer Function (STF).
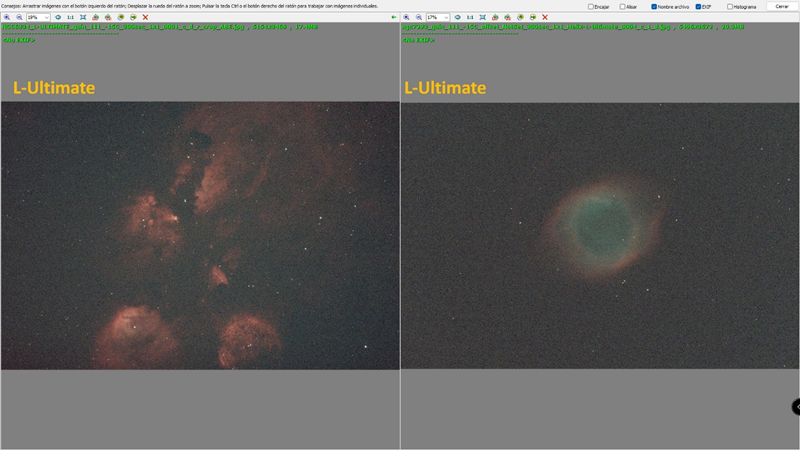
Figure 4. NGC6334 (Left), NGC 7293 (Right), SW200p+ASI183MC-PRO: 300s, Gain 111, -15 °C, Offset 20. Calibrated with Masterdark and ABE.
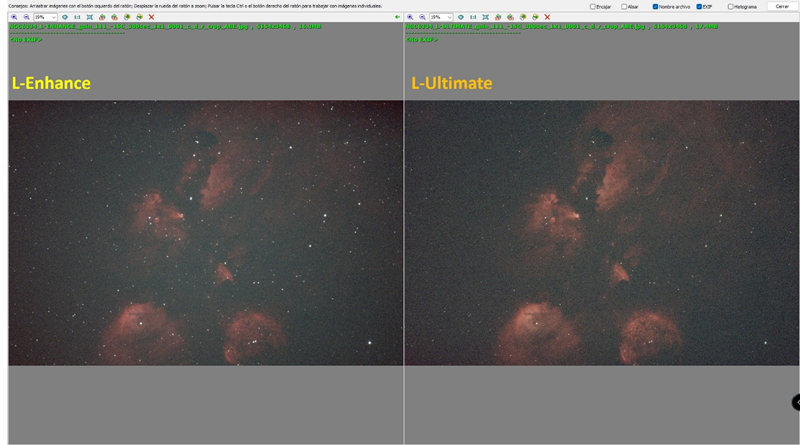
Figure 5. NGC 6334, SW200p+ASI183MC-PRO: 300s, Gain 111, -15 °C, Offset 20. Calibrated with Masterdark and ABE (complete frame).
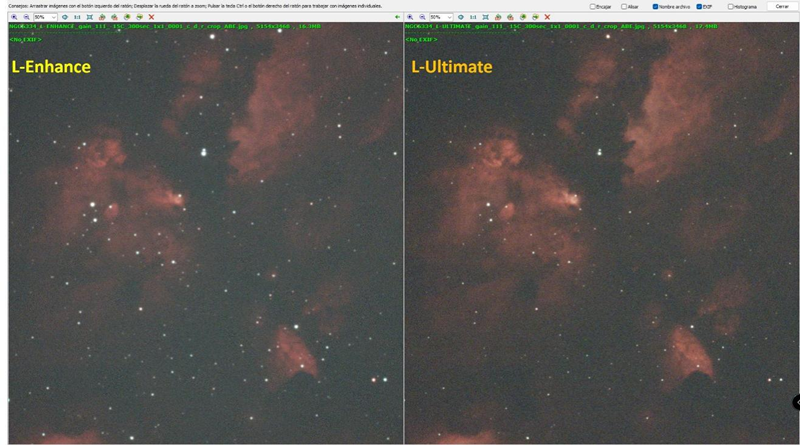
Figure 6. NGC 6334, SW200p+ASI183MC-PRO: 300s, Gain 111, -15 °C, Offset 20. Calibrated with Masterdark and ABE (ZOOM 1).
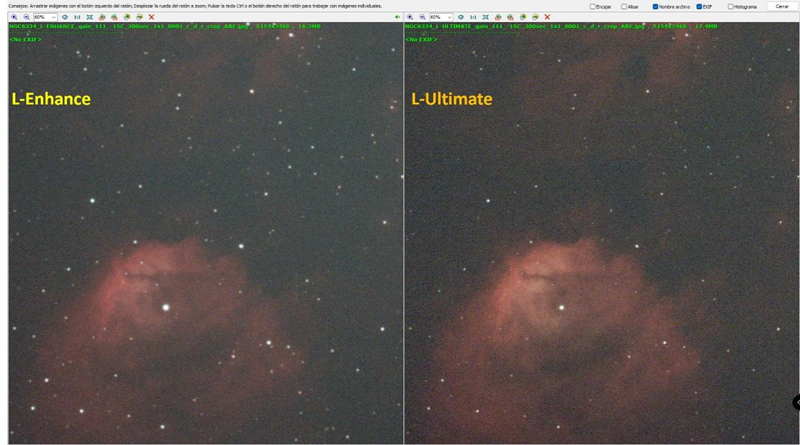
Figure 7. NGC 6334, SW200p+ASI183MC-PRO: 300s, Gain 111, -15 °C, Offset 20. Calibrated with Masterdark and ABE (ZOOM 2).
As can be seen in Figures 5, 6, 7 and 8, images obtained using L-Ultimate filter have a really improved contrast and more detail that the one made utilizing the L-Enhance filter. Also, stars are smaller in the case of L-Ultimate in comparison to L-Enhance. In addition, it can be notice that the noise is more present in the image with L-Ultimate. All these facts are really consistent with the more restrictive nature of L-Ultimate filter.
The white balance and colour of the image obtain with the STF is right away much better for the case of L-Ultimate. The information that is hitting your camera sensor is way less if you are using the L-Ultimate, but is way much better information that the one you are getting using the L-Enhance filter. This maybe was obvious from the spectral curves of both filters, but it always needs for confirmation, at least in my opinion.
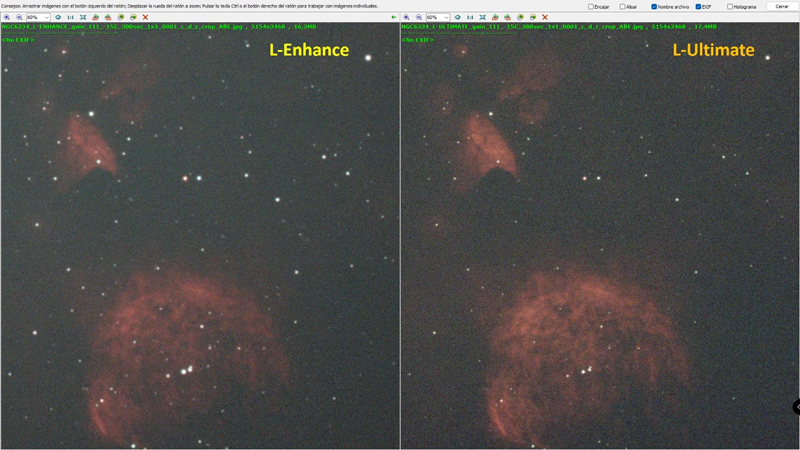
Figure 8. NGC 6334, SW200p+ASI183MC-PRO: 300s, Gain 111, -15 °C, Offset 20. Calibrated with Masterdark and ABE (ZOOM 3).
Another thing to test is the background signal that we are getting for this two filters, as the images were taken in same conditions (same night, same seeing, no moon, Bortle 9, same equipment with same setting, same exposure time, same target object) we can be fair in comparing the background signal.
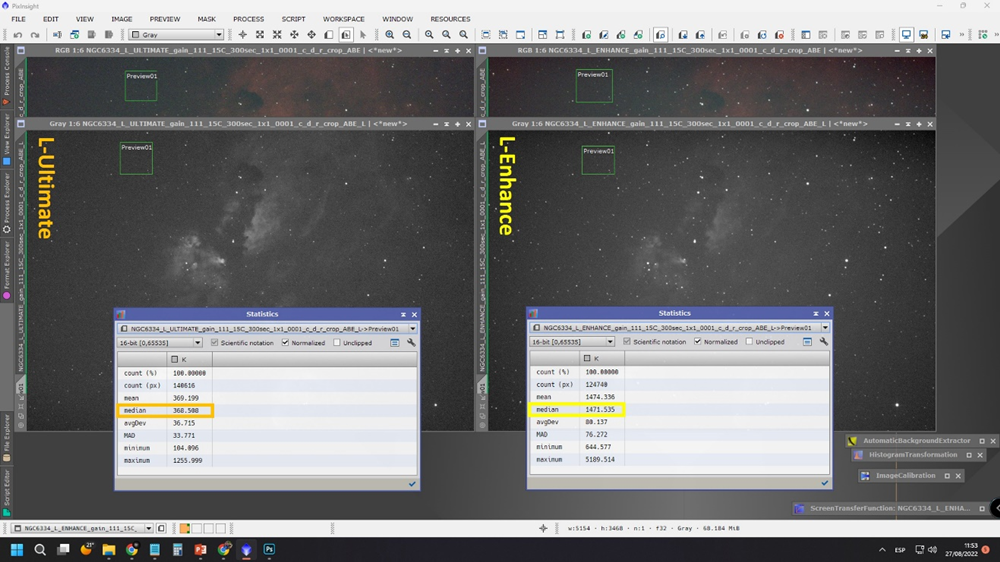
Figure 9. Background measurement in PixInsight of images done with L-Enhance and L-Ultimate in same conditions.
For this reason, calibrated individual frames, calibrated only with a masterdark and ABE (function degree 1) as I couldn’t use flats calibration, were open in PixInsight software, Luminance were extracted for each image, and a preview in the same region of background (no nebula) was used to measure the median signal in that area of background employing “Statistics” process of PIX.
As we can see, in Figure 9, median background for L-Enhance was of 1472 ADUs, in contrast to the 369 ADUs that were detected for L-Ultimate filter (almost four time less background!!!!). This is also consistent to the restrictive properties of L-Ultimate.
So, in the best of my knowledge, I think L-Ultimate is a great filter, which helps you to deal with heavy light pollution, improving the contrast and quality of the data that you are getting in narrowband bicolor (HOO) images. I can’t say if this filter is better than the L-Extreme filter that Optolong also offers because I wasn’t able to test it, but I can say that in a battle between the L-Enhance and the L-Ultimate, the latter is a clear winner.
One important thing to consider if you don't have a good mount/guidance is that L-Ultimate may not be the best option for you, because a direct consequence of its really narrow transmission bands is that you'll need longer exposure times to improve the signal-to-noise ratio (SNR) of your images, as demonstrated by measuring the background signal. By increasing the exposure times of the individual images, the problems of guiding or discarding frames become more evident. Personally, I recommend for this particular filter to start with exposure times of 300s as a starting point and work your way up from there.
Fourth Part: Nebula Image (NGC7293 Helix Nebula)
Here is my rendition of the Helix Nebula NGC 7293, imaged using L-Ultimate Filter. This nebula is an extremely faint nebula, but with this filter I was able to achieve a great level of contrast and details for the time of acquisition.
Technical data:
Main Equipment: ZWO ASI 183MC-pro + ZWO 2” Filter Drawer + SW Explorer 200p + SW Coma Corrector 0.9x + ZWO EAF + EQ6-R-Pro
Guiding Equipment: ZWO OAG, QHY5-iii 462c
Location: Córdoba Capital, Argentina. Sky Bortle 9
*Gain 111, Offset 20, -15 °C, L-Ultimate 2" Optolong, 194x300"
150 Darks
60 Flats
60 Dark-Flats
Polar Align: SharpCap 3.2
Acquisition: SGP 3.2
Processing: Pixinsight 1.8.8, PS
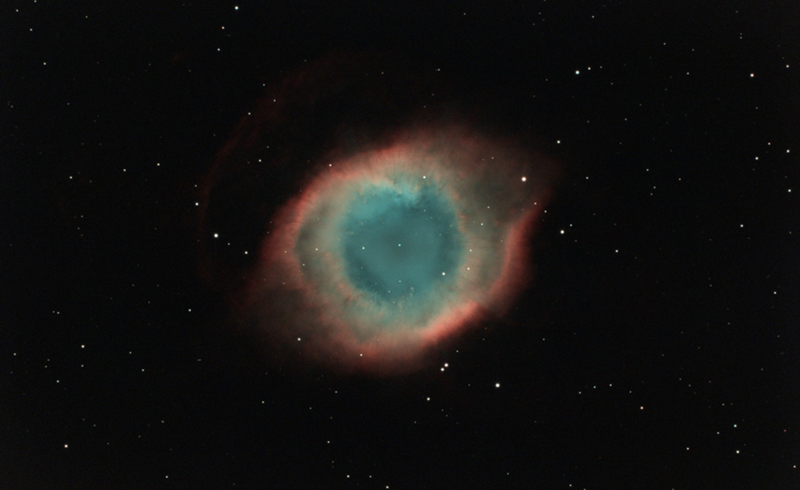
NGC 7293 – L-Ultimate from skies Bortle 9
Fifth Part: some tricks and advices
Due to the extreme narrow character of this filter I have crossed to some “problems” and here I intent to give you some tricks in order to solved them.
First problem was with plate solving and finding objects, this filter would not show too much stars so maybe in some cases the stars that you will see would not be enough to the blind solvers of your software, my simplest solution was to make longer exposures, but in the case of Helix nebula (very few stars in the FoV) I wasn’t able to do the plate solving and centering process with L-ultimate. So I use a UV/IR cut filter (Luminance) in order to do this, and then I’ve changed the filter back to the L-Ultimate Filter.
Second problem and very close to the first was during autofocus routines, but in this case solution was simpler, and making longer exposures enables me to get great focus using L-Ultimate.
That’s all, no great deal, but I thought it would be helpful to share this experiences.
Ariel L. Cappelleti
Córdoba, Argentina.