
Test of Optolong L-Quad Enhance Filter on IC 1396
Test of Optolong L-Quad Enhance Filter on IC 1396
Credit: Astrodoc Ron Brecher
October 18, 2023, Test of Optolong L-Quad Enhance Filter
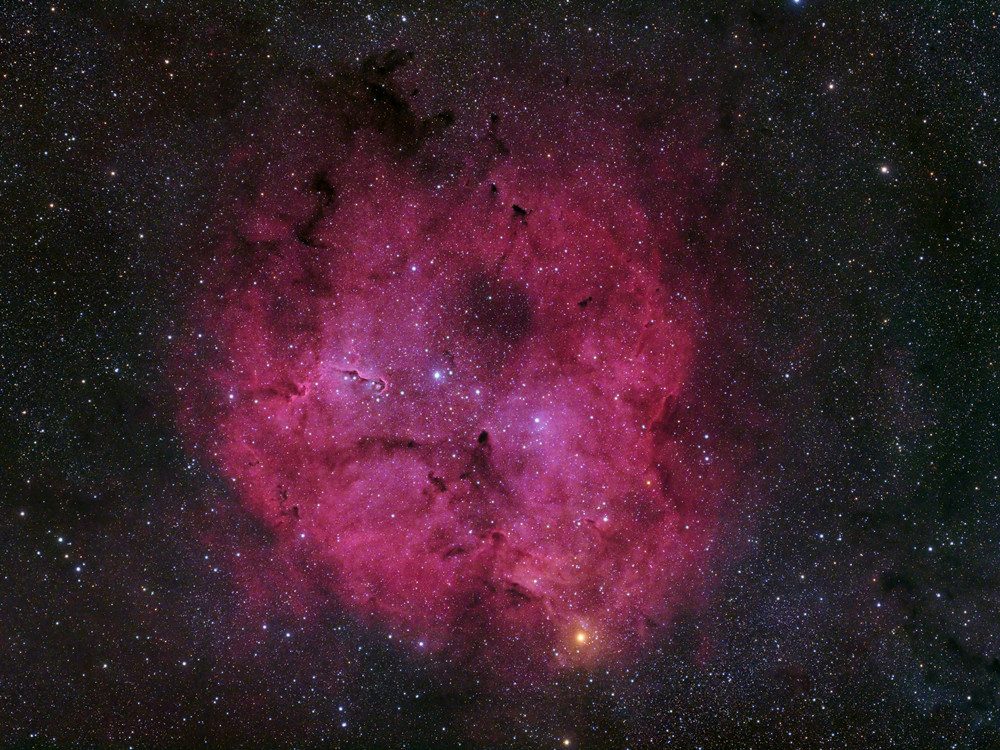
IC 1396 is a large cloud of faintly glowing gas, composed mainly of hydrogen. It is a huge object in the sky, with a diameter more than six times that of the Moon. That’s because it is both relatively close to us (2,400 light years) and big (more than 100 light years across). The energy that makes IC 1396 glow comes from the bright star near the centre of the nebula, called HD 206267. Jutting in from the 9 o’clock position is the Elephant’s Trunk Nebula, which features in another image I’ve taken of this object. The Elephant’s Trunk is a star forming region, and there are a number of very young stars — less than 100,000 years old — in its vicinity. IC 1396 is textured throughout with many dark nebula. It’s hard not to notice mu-Cephei, the brightest star in the image, near bottom centre. It is about 38,000 times as bright as the Sun. Bring your sunscreen.
Many people prefer these nebulae displayed in greyscale (black & white) images. I usually prepare both, but in this case I did not, as I was using a colour camera. You can find a greyscale version of my 2017 image of this object here.
This is the first extended object that I have imaged using the Optolong L-Quad Enhance Filter (LQEF).
It allowed the red to come through nicely while blocking the “orange-red” wavelengths associated with light pollution. This provided an apparent red boost, but it is actually just a boost in contrast. I think imagers in light polluted skies will find this filter useful.
Tekkies:
Takahashi FS-60CB scope with flattener at f/6.2 and QHY367C Pro one-shot colour camera with Optolong L-Quad Enhance Filter.
Paramount MX, unguided.
Equipment control with N.I.N.A. and PHD2.
All pre-processing and processing in PixInsight.
Acquired from my SkyShed in Guelph September 29 to October 6, 2023.
Average transparency and seeing, and no Moon.
37x5m chrominance = 3hr05m
Image scale 2.71 arcsec per pixel
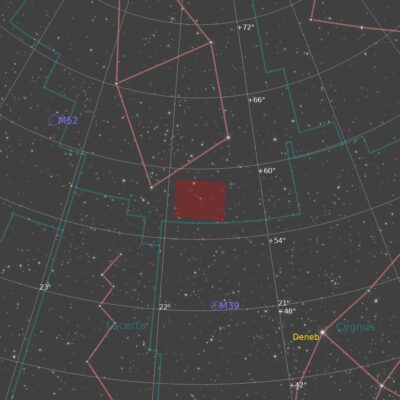
Finder Chart and Annotated Image:

Data Reduction and Linear Processing
Preprocessing: The WeightedBatchPreProcessing script was used to perform calibration, cosmetic correction, weighting, registration, local normalization, integration and Drizzle integration of all frames (CFA Drizzle checked, Scale=2x, Drop Shrink=0.9).
Gradient Removal: DynamicBackgroundExtraction was applied to the OSC master.
Colour Calibration: ColorCalibration was used to calibrate the OSC master.
Deconvolution: BlurXterminator was applied using an automatic PSF, star sharpening set to 0.10, and “Correct First” selected.
Star Removal: StarXterminator was used to remove the stars, with Unscreen selected.
Linear Noise Reduction: NoiseXterminator was applied with Amount=0.95 and Detail=0.5
Stretching: HistogramTransformation was applied to make a pleasing yet bright image. Approximate background level after stretch was 0.10
Nonlinear Processing
Nonlinear Noise Reduction: NoiseXterminator was applied with Amount=0.9 and Detail=0.25
Stretching: HistogramTransformation was applied a second time to adjust the black point and increase brightness and contrast. Approximate background level after stretch was 0.10
Contrast Enhancement: Using a mask to select the nebula, LocalHistogramEqualization was applied twice. A Contrast Limit of 1.5 and 1 iteration was used for each LHE application (scale 40, strength 0.25; scale 125, strength 0.35).
Sharpening: The same mask was used with MultiscaleMedianTransform to sharpen Layers 1 – 5 with strengths of 0.01, 0.03, 0.05, 0.03, and 0.02, respectively.
Stars-only steps: CurvesTransformation was used to add saturation to the stars through a mask made by extracting the Luminance from the stars-only image.
Star Restoration: PixelMath expression combine(starless, stars, op_screen()) was used to combine the starless and stars-only images created with StarXterminator.
Final Steps: Background, nebula and star brightness, contrast and saturation were adjusted in several iterations using CurvesTransformation with masks as required. The image was down-sampled by a factor of 2, which restored it to the original resolution. ICCProfileTransformation (sRGB IEC61966-2.1; Relative Colorimetric with black point compensation) was applied prior to saving as a jpg. The image was annotated with the AnnotateImage script. The finder chart was made using the FindingChart process.
Article quotes from the web Astro Doc.ca .